Personal Blog with HTMX + Go: Part 3 - Server-Rendered Markdown
This article will cover part 3 of the #blogging Tutorial. This one is going to be long as we start deep-diving into making some interactive stuff with the help of #HTMX. If you need a refresher, you can read the first or the previous part.
What We’re Going to Do Today
This time, we’re about to make a fancy Markdown to HTML Renderer but on the server side. Why? First, it will be a good demonstration of making an interactive element using HTMX. Secondly, Why not? It’s kinda cool, isn’t it?
Dependencies
First, we need to sort out our dependency. We need to add a Markdown parser for Golang.
What? Why not make your own parser?
I know I know, maybe I oversell it a bit. Technically we can, but it will be quite an effort, especially for the coverage of a single blog post. But there’s more reason for that.
HTML Sanitization is one thing, then there are many different flavors of markdown to support. It’s also a bit out of scope because we’re here to highlight how HTMX is useful for creating interactive apps.
Okay, now we need to add our dependency first. My Markdown parser of choice is GoldMark. It’s fast and has quite an extensive amount of available extensions you might want. It also handles sanitization quite well for basic stuff.
Let’s add our dependency to our Go project via:
go get github.com/yuin/goldmark#Goldmark also brings its extension called GFM (GitHub Flavored Markdown) and Typographer. We will need these two extensions to increase our markdown parsing capabilities.
GFM, as the name suggests, adds GitHub style Markdown tags, such as table, strike-through, and linkify. There’s more to it, but you can read it yourself in the formal spec here.
Markdown parsing
Next, we need to create a new file called utils/markd/markd_parser.go and set the content as follows:
package markd
import (
   "bytes"
   "string"
   "github.com/yuin/goldmark"
   "github.com/yuin/goldmark/extension"
   "github.com/yuin/goldmark/parser"
   "github.com/yuin/goldmark/renderer/html"
)

var mdParser goldmark.Markdown

func init() {
   mdParser = goldmark.New(
      goldmark.WithExtensions(
         extension.GFM,
         extension.Typographer,
      ),
      goldmark.WithParserOptions(
         parser.WithAutoHeadingID(),
      ),
      goldmark.WithRendererOptions(
         html.WithHardWraps(),
      ),
   )
}
Cool! Now we have created a simple markdown parsing client. Next, we need to add the public function that is accessible by other modules to parse the markdown into HTML:
func ParseMD(source string) (string, error) {
   var buf bytes.Buffer
   if err := mdParser.Convert([]byte(source), &buf); err != nil {
      return "", err
   }
   result := buf.String()

   return result, nil
}
Next, let’s create an endpoint where we can render our markdown to some webpage. First, let’s define the endpoint function in the main.go file’s main function:
e.GET("/markdown", func(e echo.Context) error {
   markdowns := "# Header1\n## Header 2" // Markdown example
   parsed, err := markd.ParseMD(markdowns)
   if err != nil {
      return err
   }
   res := map[string]interface{} {
      "ParsedMarkdown": parsed,
   }

   return c.Render(http.StatusOK, "markdown", res)
})
This endpoint will serve yet to-be-created template called markdown where we should pass the content of the following markdown:
# Header 1

## Header 2
as ParsedMarkdown and pass it down to the template body. If rendered correctly, it should be something similar to this:
<h1>Header 1</h1>
<h2>Header 2</h2>
Next, we should create a new html file where the rendered markdown should live. It should be similar to what we learned in Part 1.
Let’s name it as /public/markdown.html:
{{define "markdown"}}
<!-- This is tailwind class for bright blue-greyish background, horizontally centered div with padding of 6 in all direction-->
<div class="p6 mx-auto bg-slate-100">{{.ParsedMarkdown}}</div>
{{end}}
As we learned in Part 1, partial is not a valid HTML. This is where HTMX comes in handy, as we can reuse the index.html again, and add a button that will swap with the partial markdown.html and we will get valid HTML after the swap.
To do that, let’s modify our index.html a little bit by adding the following lines of code under the user-info <div> we had previously:
<div id="user-info">...</div>
<!-- Put following lines here-->
<div id="markdown">
  <button hx-get="/markdown" hx-target="#markdown-part" hx-swap="innerHTML">Parse Markdown</button>
</div>
This will simply add a button underneath the previous button we had, and it will call /markdown via HTMX and swap the innerHTML of the markdown <div> accordingly.
Now, if everything is according to plan, we should see a well-rendered markdown in our blog post. We should try to run it now.
Run the tailwind build command (npx tailwindcss -i ...etc) and then run the go server ( go run .) and open localhost:4040 in our server:
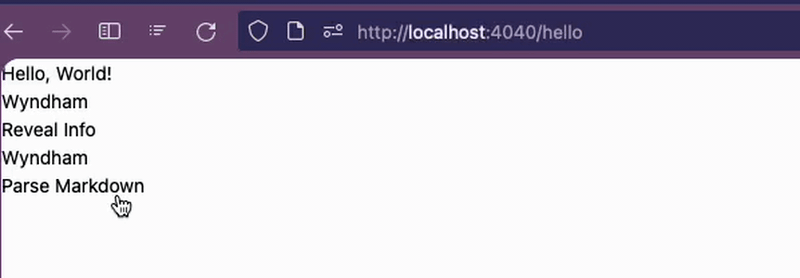
Yeay!… or not? While the Tailwind class we specified before is rendered correctly, the header looks the same… what gives? Is the markdown rendering not working?
Nope, it’s working just fine.
Press F12 and open inspector, and see exactly that we have already rendered both <h1> and <h2> as per the standard rendering of Markdown to HTML:
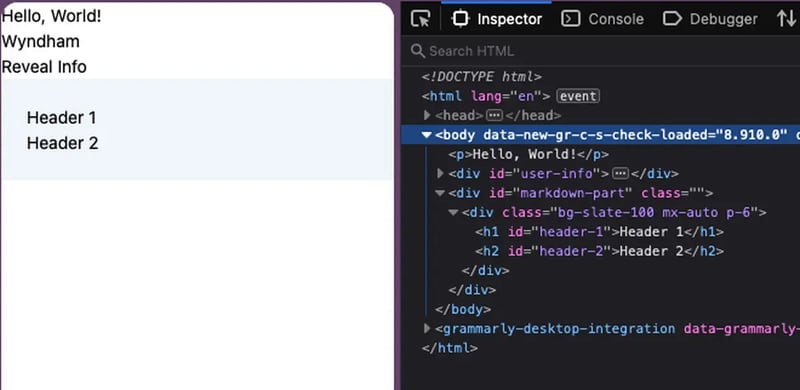
But it looks a bit.. underwhelming isn’t it? you would think that a well-rendered markdown would be similar to what GitHub offering would look like. But let alone have nice styling, <h1> and <h2> does not render any differently.
Tailwind Typography
We will not cover all the styling parts, as it will take quite a long time. But this would be the perfect moment to introduce one of the most useful Tailwind Extensions: Tailwind Typography.
Why Tailwind Typography?
Realistically when it comes to styling, we can include tailwind classes in the HTML and call it a day. But I am personally against this for three reasons:
- Introducing CSS class will open the opportunity for XSS attack, especially when it comes to User Generated Content. However, it would be less of an issue if this was going to be used for a personal project or you know most likely you’re going to be the one making the content.
- As of right now, GoldMark does not have an easy way to add custom attributes.
- You typically do not want to make the content of a blog post carry its own styling. Decoupling the content of your blog from the UI (including theme, color, and many others) allows you to modify the UI after the fact.
With that in mind, we still need to somehow introduce styling to our content. There are ways to do this by using CSS selectors like this:
.h1 {
  @apply text-slate-900;
}
But applying this globally against HTML elements will also cause more styling issues down the line. Fortunately, Tailwind has the exact solution to our problem which is Tailwind Typography.
I won’t go deep dive into what is Tailwind Typography, but I will just jump straight to the specific implementation we’re aiming for: stylize the different headers.
Implementing Tailwind Typography
It’s rather easy to do. First, make sure that the extension is already declared in the tailwind.config.js:
module.exports = {
  content: ["./public/**/*.html"],
  ...
  plugins: [
     require('@tailwindcss/typography'), // Ensure this line added
  ],
}
Then go back to our markdown.html code up there for a second:
{{define "markdown"}}
<!-- -->
<div class="p6 mx-auto bg-slate-100">{{.ParsedMarkdown}}</div>
{{end}}
We should modify the parent div class attribute in it to be like this:
{{define "markdown"}}
<!-- please look at the class attribute content-->
<div
  class="p6 prose prose-h1:text-4xl prose-h2:text-3xl prose-h3:text-2xl prose-h4:text-xl prose-h5:text-lg mx-auto bg-slate-100"
>
  {{.ParsedMarkdown}}
</div>
{{end}}
Those extra classes are pretty straightforward. Let’s take the prose-h1:text-4xl as example:
- If
proseclass is applied, then please apply the following styling toh1element. - please apply class of
text-4xl(text size4xlin tailwind) toh1element.
All other attributes are the same, but just applying it to other header sizes.
Now if we’re to run our code again, it should show something like this:

Looks great right? But you might be wondering why we got more than we bargained for. Like now it’s centered horizontally and has a specific width applied to it. That’s what prose class is used for. You can read more here. But the gist is it’s just what Tailwind Typography does and it will help us build our simple blog faster.
Putting it all together
Now all of the ingredients are here:
- Render from Markdown to HTML on the server.
- Display rendered HTML to the client.
- Stylize the HTML.
Next, we need to put it all together. The steps we’re going to take should be consist of:
- Create a new page and add a text area where the client can write their markdown.
- Use
hx-postandhx-triggerto send the markdown to the server to be rendered in real time. - Add an endpoint to accept the markdown text, and render it to HTML, then return the HTML to the client, and make use of
hx-swap.
So let’s just get into this now.
Create a New Page
First, let’s create a new endpoint to start fresh:
e.GET("/editor", func(c echo.Context) error {
	return c.Render(http.StatusOK, "editor", nil)
})
This endpoint should return a new page that will host our simple editor. But before it can do anything, let’s create the ./public/editor.html first, so we can see what we’ll be making:
{{define "editor"}}
<!DOCTYPE html>
<html lang="en">
<head>
<!-- copy paste from index.html -->
</head>
<body>
<div class="flex w-full flex-row">
<textarea class="min-h-96 flex-1 p-6" id="editor"> </textarea>
<div id="preview" class="min-h-96 flex-1 bg-stone-50 p-6"></div>
</div>
</body>
</html>
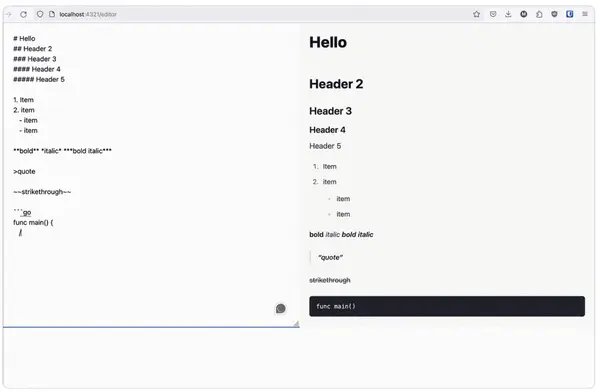
{{end}}It’s a simple HTML page with div and has two elements as its child. One of which is textarea marked as editor and the other is simply div marked as preview. Both of which have equal widths and are split in half in the middle.
What we’re going to make is a split editor where you write your markdown on the left side, and render the output on the right.
If done correctly, it should render to this:

Next, we’re going to repurpose the markdown.html we had previously to display the content on the preview side. But first, we need to modify it:
<!-- before -->
<div
  class="prose prose-h1:text-4xl prose-h2:text-3xl prose-h3:text-2xl prose-h4:text-xl prose-h5:text-lg mx-auto p-6"
>
  <!-- after -->
  <div
    class="prose prose-h1:text-4xl prose-h2:text-3xl prose-h3:text-2xl prose-h4:text-xl prose-h5:text-lg"
  ></div>
</div>
HTMX Boogaloo!
Next is the fun part. We’re going to make use of the hx- attributes to add some interactivity to the textarea above. Add the following attributes to the textarea :
<!-- add the hx-..., type, and name attributes -->
<div class="flex w-full flex-row">
  <textarea
    ...
    hx-post="/editor/render"
    hx-trigger="keyup delay:500ms"
    hx-target="#preview"
    hx-swap="innerHTML"
    type="text"
    name="content"
  >
  </textarea>
  ...
</div>
Those extra attributes bring us quite a lot of functionality on the table. When described, it will do the following:
hx-trigger=> Whenever eventkeyuphappened (keyupis triggered whenever the user stops typing on the keyboard), and debounces the event for 500ms.hx-post=> Then after that, send an AJAX RequestPOSTto endpoint/editor/render.hx-target=> After that, put the response from the AJAX towards the element with the CSS Selectoridofpreview(hence the#prefix).hx-swap=> And please put the response inside the target element.name=> When AJAX happens, please carry the contenttextareaalong. And please set theForm-Datakey tocontent.
If you run it and start typing in the text area, you will see that there’s a new AJAX request against /editor/render the endpoint which returns 404.
If you open the Request tab, you’ll see the exact content of the text area in the form of data, like this:
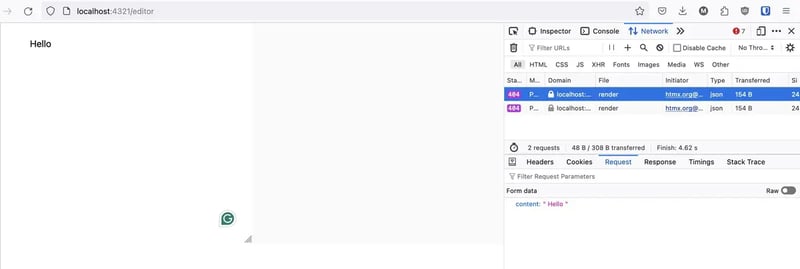
Which is good! now we know that we can interactively send the text area content to the server, and the server will be able to render the HTML for us!
Final Piece to The Magic
Next, we need to create the aforementioned /editor/render endpoint. This time we will be using POST :
    // Create  following endpoint in the `main.go`
	e.POST("/editor/render", func(c echo.Context) error {
         // This code will bind the Form-Data content
         // to the struct RenderReq
		var payload RenderReq
		err := c.Bind(&payload)
		if err != nil {
			return err
		}

         // Next, we render the RenderReq.Content
         // which should be markdown using our parser
		parsed, err := markd.ParseMD(payload.Content)
		if err != nil {
			return err
		}

         // And just like the example before
         // we put the parsed markdown in the result
         // and render the `markdown.html` template.
		res := map[string]interface{}{
			"ParsedMarkdown": parsed,
		}
		return c.Render(http.StatusOK, "markdown", res)
	})
...
// Create following struct outside the main function
type RenderReq struct {
	Content string `json:"content" form:"content"`
}
Once we add the endpoint, and restart the deployment you should be able to do this:

And just like that, we have our server-rendered Markdown done. It’s not that much code but we achieve quite a lot here!
Final Words
Now that we’re finished with this part 3, we have some room to breathe. In the next part, we’ll be improving the Developer Experience a little bit by adding:
- TempL for component-based UI, similar to JSX
- Air for hot reload
- ESBuild so we can use JS Libraries.
Looking forward to it, don’t you? See you in part 4!